
Formatting Amazon Product Descriptions with HTML: Fast Guide
In the competitive world of online sales, your Amazon product description holds immense power. Alongside captivating images and an enticing title, it serves as the gateway to turning curious shoppers into satisfied customers. However, navigating Amazon’s guidelines regarding HTML usage in product descriptions can be perplexing.
Let’s delve into the intricacies of formatting your Amazon product descriptions with HTML. By incorporating line breaks, bullet points, and bolding text, you can unlock the potential to elevate your listings and drive greater sales.
Table of Contents
Is HTML Allowed in Amazon Product Descriptions? Navigating Amazon’s Guidelines

As you probably already know, your product description plays a huge role in your online sales. Along with your Amazon product title, photos, and videos, product descriptions compel shoppers to click that “buy now” button.
However, there seems to be a lot of confusion as to whether HTML is allowed in Amazon product listings. According to Amazon’s product detail page rules, it states:
“Do not include HTML, DHTML, Java, scripts, or other types of executables in your detail pages.”
But what’s confusing is that Amazon’s system still allows you to input HTML into your product description field, despite saying not to. So, as usual, it appears this is just one of the many instances of Amazon saying one thing but not enforcing it.
So what do I recommend?
I think as long as you’re fine with the chance of Amazon possibly contacting you, adding HTML to your product description is a great way to boost conversions. In fact, plenty of Amazon sellers do it.
Let’s be honest, Amazon’s plain text description format leaves a lot to be desired. Here is the default description format below:
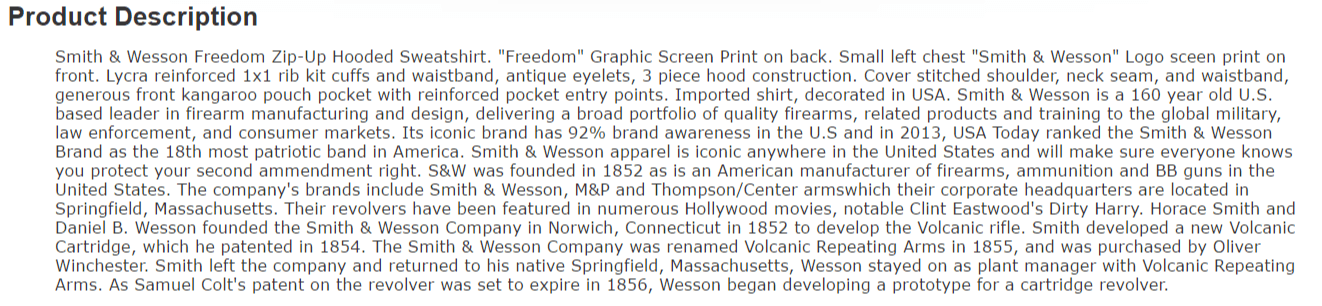
As you can see, all the text is bunched together, which makes it hard to read. This leads to lower conversions. However, since Amazon’s system allows for basic HTML formatting in the description, it can make a huge difference in boosting your sales and attracting more buyers.
To be safe, I always recommend adhering to your Amazon marketplace’s and product category’s requirements. Be sure to carefully review them before making any changes.
How to Add HTML to Your Amazon Product Description

The secret to creating an effective product description is to make it clear, descriptive, and easy to read. By adding a few simple Amazon HTML tags, you can break up large chunks of text, highlight important info, and improve readability.
Here’s a quick guide for the basic HTML tags you can include in your Amazon description:
Bold/ Strong Tags: <b> </b>
Bold tags allow you to make text bold. Everything between these tags becomes bold. This is useful if you want to highlight something important in your Amazon product listing, such as unique product features, key benefits, and relevant keywords. For example:
<b>Humpty Dumpty</b> sat on the wall.
This appears as:
Humpty Dumpty sat on the wall.
Line Break: <br>
Line break tags allow you to break up lines of text in Amazon product descriptions. They enable you to start a new line immediately following the previous one, making your sales page content much easier to read.
For example, let’s say you want to have the two sentences to appear as below:
Jack and Jill Went up the hill To fetch a pail of water,
Jack fell down and broke his crown and Jill came tumbling after.
Hitting the enter key between the two sentences isn’t going to do anything in your description. To break up the two lines, you would have to enter it like this:
Jack and Jill Went up the hill To fetch a pail of water,<br>Jack fell down and broke his crown and Jill came tumbling after.
This would result in this:
Jack and Jill Went up the hill To fetch a pail of water,
Jack fell down and broke his crown and Jill came tumbling after.
Paragraph Break <p> </p>
Another option for line breaks is paragraph breaks. However, the main difference between these two tags is that the paragraph break adds some extra padding between each line of text. Similar to the line break, paragraph breaks are great for breaking up text and making your description easier to read.
Example:
Say you want the text to look like this:
The wheels on the bus go round and round Round and round, round and round.
The wheels on the bus go round and round All through the town.
To do this, you would include the paragraph tags like this:
<p>The wheels on the bus go round and round Round and round, round and round.</p>The wheels on the bus go round and round All through the town.
This would give us this:
The wheels on the bus go round and round Round and round, round and round.
The wheels on the bus go round and round All through the town.
As you can see, the paragraph tag adds some extra padding between the two lines of text.
You can even combine multiple tags in your description. For example, you could include bold fonts, link breaks, and paragraphs as follows:
<p>The wheels on the <b>bus</b> go round and round Round and round, round and round.</p> The wheels on the <b>bus</b> go round and round <br>All through the town.
This would look like:
The wheels on the bus go round and round Round and round, round and round.
The wheels on the bus go round and round
All through the town.
Bullet Point Lists: <ul>, <ol> & <li>
Besides the Amazon product features section, you can also add bullet points to your product description. These tags allow you to create bullet or numbered points in your description. The ‘ul’ tag stands for ‘unordered list’. Everything between these tags will be in bullet points, while the ‘li’ tags separate each bullet point. To create bullets, here’s what you would put in:
<ul>
<li> Point 1 </li>
<li> Point 2 </li>
</ul>
This would give us this:
- point 1
- point 2
If you wanted to create numbered bullet points, we would use the OL tag instead.
<ol>
<li> Point 1 </li>
<li> Point 2 </li>
<li> Point 3 </li>
</ol>
This would give us this:
- point 1
- Point 2
- Point 3
See, that wasn’t too difficult, was it?
I recommend using an Amazon HTML editor to preview your product description and see how it looks before you publish it. There are many free options available, but one you can check out is from SoStocked or SellerApp. Both of these allow you to easily add HTML code to your text on the front end and will output the appropriate HTML code that you can copy and paste into your listing’s description section.
Another Option: Unlocking Enhanced Brand Content (EBC) on Amazon

If sellers qualify, a better option is to apply for EBC Amazon Enhanced Brand Content (EBC). EBC is an exclusive feature tailored for brand-registered sellers on the Amazon platform. It empowers sellers to enrich their product listings with visually appealing and informative content, including enhanced images and text placements. This feature enhances the overall shopping experience for customers, leading to increased engagement and conversion rates. To qualify for EBC, sellers must hold a registered trademark for their brand and enroll in Amazon’s Brand Registry program. Once approved, sellers can leverage the Amazon Seller Central platform to craft and upload their unique EBC content, strengthening their brand identity and standing out among competitors in the marketplace.
If you’re looking for help with your Amazon EBC listing, my Amazon Enhanced Brand Content copywriting services can help.
Summary
As we have discussed, the use of HTML tags for your Amazon product description is still controversial and confusing. However, adding some simple HTML code to your listing can boost your conversions and click-to-sales rates (CTS) by highlighting essential product details. Both of these benefits help to trigger Amazon’s algorithm and improve your product’s ranking. This improvement could potentially lead to your product appearing on the first page of search results.
By adding just a few basic Amazon HTML tags, such as line breaks, bullets, or bolding, you can dramatically enhance your product description and increase the chances of your product being sold. As mentioned, Amazon only allows for basic HTML, so there are limitations on how much formatting you can do to your description. Unfortunately, this means you can’t embed any photos or videos or do other fancy things in your description.
If you’re looking for more ways to enhance your product descriptions, be sure to check out my Amazon copywriting services. I’ll work with you to optimize your listing and create captivating and persuasive product descriptions that truly stand out to shoppers.